

Learn more about creating accessible learning content in our Teaching Center.
-
Instructors: How to Mark Your Courses as Accessible
Read articleAccessibility is the practice of making your content usable by as many people as possible. This article outlines how you can make your course accessible, and notify potential learners by indicating where content has been created for those with accessibility needs.
- Learn more about creating accessible learning content for your courses.
Accessibility checklists for instructors
Under “Create your content” you will find guidelines for course accessibility and the ability to indicate whether your course meets our criteria. Once you are confident that you have met the criteria outlined, you can mark your course as containing: 1) accessible closed captions, 2) accessible audio content, and 3) accessible course materials.
Accessibility indicators for learners
When you mark your course as having accessible captions and audio content, it will be indicated on your course landing page.
In addition, courses marked as having accessible captions can be found via a search filter on the Udemy marketplace.
Accessibility issues
Please ensure your content meets the accessibility guidelines before updating its status. If a learner reports an accessibility issue for a course that has been marked as accessible, the course will be reviewed by the Trust & Safety Team to ensure the landing page information is accurate.
Please note: While we strongly recommend adding accessibility features to your course, they are not a requirement for course publication. However, courses that do meet our accessibility guidelines are open to a wider audience of potential learners.
Closed captions accessibility checklist
- Make sure that captions meet a 99% accuracy rate — please check the auto-generated captions.
- Spell out all relevant sound effects pertinent to the course, for example: (beep) or (click).
- Indicate any non-speech elements like music, such as : (Jazzy music).
- Use verbal delivery style indicators,, for example: (Exclaims).
- Identify on- and off-screen speakers with captions.
Learn more about providing accessible closed captions.
Audio content accessibility checklist
- Try to make your audio script stand on its own like an audiobook. Where possible, do not have your script dependent on visuals.
- Explain what is on the screen when visual content isn’t decorative. Allow time to consume your content. Speak at a measured pace, that is not too quick. And pause to allow time for learners to consume your content, both audio and visual.
- Use plain language. Keep sentences and paragraphs concise.
- Use common words and avoid overly casual or colloquial language, abbreviations and jargon, and avoid complicated metaphors and idioms.
- Be clear, precise and to the point in your language to emphasize key points. Saying the same thing in different ways can be helpful to your learners’ comprehension.
Learn more about providing accessible audio content.
Course materials accessibility checklist
- Provide a table of contents for long documents and a glossary of terms .
- Use semantic markup for headings, bulleted lists, or numbered lists for all documents
- Organized content in short paragraphs and/or simple tables
- Link to external resources with descriptive language
- Provide alternate text for all images in documents or slide presentations
- Use strong color contrast for text and images
-
Creating Accessible Learning Content
Read articleAccessibility is the practice of making your content usable by as many people as possible. People often think of making content accessible for people with disabilities, but the practice of making content accessible impacts so many more groups, including those using mobile devices, those who may have slow network connections, and so many more.
In order to make course content accessible, we’ve provided some general recommendations for instructors to consider while creating their content. You can learn more about creating accessible learning content in our Teaching Center.
-
Instructors: How to Navigate to The Course Curriculum Page
Read articleThis article outlines how instructors can navigate to the Curriculum page for their courses, whether they’re creating a new course or updating an existing one.
How to navigate to the Curriculum page of your course
To navigate to the Curriculum page of a course you’ve created, please follow these steps:
1. After logging into your Udemy account, click Instructor at the top right.
2. You will be directed to your Courses page. Next, move your cursor to the course you wish to update and select Edit / manage course.
3. After clicking through, simply select Curriculum on the left-hand side.
Adding sections, lectures, and video content to your course curriculum
Learn how to add sections, lectures and video content to your course.
-
Free Courses: What Should Instructors Know?
Read articleOffering your courses for free on the Udemy marketplace is one way instructors can try teaching on our platform, help build a student audience, and test the demand for a topic. It’s also another way for instructors to receive student feedback about your teaching methods.
This article includes answers to some of the common questions we receive from instructors, regarding free courses and the simplified learning experience.
Please note: additional information regarding changes Udemy made to free courses in 2020, and how instructors can utilize free courses effectively, is available in this Teaching Center resource.
- Is there any difference between a free and paid course? Other than the price?
- What are the minimum requirements for a free course?
- What if a student enrolls in my paid course through a free coupon I shared out? Will they have access to all the course content and features?
- Can I change my course from free to paid? Or vice-versa?
- How can I change a course from free to paid?
- Can I charge a price for my course on Udemy but offer it for free elsewhere?
Is there any difference between a free and paid course? Other than the price?
Yes. Free courses on Udemy offer students a simplified learning experience. This simplified experience limits the features that are available in a free course compared to a paid course.
For example, free courses do not offer a certificate of completion. Additional course features like the Q&A and direct messaging (even if enabled by the instructor) are not included in free course enrollments.
In addition, all free courses published after March 17, 2020 must be under 2 hours in video length.
What are the minimum requirements for a free course?
The minimum requirements to publish a free course are the same as a paid course, except, all free courses published after March 17, 2020 must be under 2 hours in video length.
What if a student enrolls in my paid course through a free coupon I shared out? Will they have access to all the course content and features?
Yes. Students who enroll in paid courses via instructor coupons, our gifting option, or Udemy credits will have access to all the course features. The term “free course” refers to courses that do not have a price set for them by the instructor.
Can I change my course from free to paid? Or vice-versa?
While instructors can change the price of their course at any time, a course can only be switched from free to paid once. If the course is switched from free to paid and back to free (or vice versa) after the course is published, the promotional announcements for the course will be permanently disabled.
How can I change a course from free to paid?
In order to change a course from free to paid you must be registered as a premium instructor. Learn how to set the price of your course.
Can I charge a price for my course on Udemy but offer it for free elsewhere?
No. Courses that you charge for on Udemy cannot be offered for free off of Udemy (e.g. YouTube, your own site, other sites).
-
How to create practice tests or practice test courses
Read articleThis article explains the differences between a practice test and a practice test course, and how instructors can create them.
- Learn how to add questions to a practice test or a practice test course.
- Learn how to access and review practice test insights.
Table of contents
- What are practice tests?
- The different modes for practice tests: practice and exam
- How to add a practice test to your curriculum
- How to create a practice test course
- Unpublishing a practice test
What are practice tests?
Practice tests are a valuable resource when preparing for third-party certification exams.
Instructors can create comprehensive, long-form simulated tests that are designed to resemble the actual exam in format and difficulty. They serve as an effective tool for learners to gauge their professional skills.
By using practice tests, learners can assess their current knowledge, identify areas for improvement, and become familiar with the types of questions they will encounter in the exam. This approach boosts learner confidence and helps increase the chances of passing an exam.
Please note that due to the unique and proprietary nature of many practice tests, they can only be added to paid courses.
The different modes for practice tests: practice and exam
Learners can interact with practice tests in “practice mode” or “exam mode.”
Practice mode:
- Learners can check answers to questions immediately while working through the test
- Learners can focus on specific subject domains
- Learners can progress through the test with no time limit and at their own pace
Exam mode:
- Simulates the actual test environment
- Times the session like a real exam
- Learners cannot check their answers until after completing the test
How to add a practice test to your curriculum
To add a practice test for your course curriculum, please follow the steps below:
1. Navigate to the Curriculum page of your course.
2. Within a section, click + Curriculum item and then select Practice test.
3. Enter the practice test’s title and then click Add Practice Test.
4. Next, click on the pencil icon beside the practice test title to begin planning the practice test.
5. Enter a description for the practice test, how much time learners have to complete the exam, and the minimum score students must get in order to pass it. The option to randomize the order of questions and answers in the exam, can also be toggled on here.
Once this information has been entered, click Save to proceed. You can now begin adding questions to it.
Please note that a maximum of two practice tests can be published in a regular Udemy course.
How to create a practice test course
Practice test courses help students prepare for certification exams, by providing practice questions. Practice test courses only include practice tests, and do not include other curriculum items like lectures and quizzes.
If you wish to create a course that only contains practice tests, follow these steps:
- Click Instructor at the top of the page.
- Next, click New Course.
- Select the Practice Test option that appears.
- Follow the steps outlined above to create your practice tests and then add questions to them.
- Publish your course.
Please note:
- Practice test-only courses must have a minimum of two practice tests in order to be published to the marketplace.
- A maximum of 6 practice tests can be added to practice test-only courses.
- Practice test-only courses do not offer a certificate of completion.
Unpublishing a practice test
If you need to unpublish a practice test moving forward, you can do so by clicking the unpublish icon at the top of the page.
Please note: once a practice test has been published for a live course it cannot be deleted. This is to ensure that learners will always be able to access their practice test results. You can, however, unpublish the practice test, which will prevent new students who enroll in your course from taking it.
-
Using The Captions Editing Tool
Read articleAs part of Udemy’s plan to expand the global reach of instructors, and help make course content more accessible to students around the world, Udemy provides auto-generated subtitles for thousands of eligible courses. If you wish to improve and edit the auto-generated subtitles that were generated for your course, you can do so by using Udemy’s caption editing tool. In addition, you can also use the tool to edit captions that you’ve created and uploaded yourself.
- Please note that the caption editing tool cannot be used to create new captions for your course. Learn how to create new captions for your video lectures.
- Review answers to frequently asked questions from instructors regarding our auto-generated captions program.
- Learn more about creating accessible learning content.
How to use the captions editing tool
If you would like to use the captions editing tool to improve the subtitles that have been added to your course, please follow the steps below:
1) Click Captions on the left hand side of the Course Management page.
2) On the captions page, click Edit on the right hand side of the lecture you wish to edit the captions for. You will be directed to the caption editing tool.
3) Navigate between the caption entries by clicking the text in the right column of the editing tool, or by clicking around the progress bar of the video player, which corresponds with the timestamp.
4) As you watch the lecture video, you can make edits to the captions in each timestamp entry, by clicking on the entry and typing in the change. As you type your edits in the caption entry on the right, you will also be able to see the changes on the lecture player screen.
5) Once you’re done editing the captions, click Save and Publish at the top right of the page
Please note: after clicking Save and Publish, the changes to the course captions will become live in your course. If you exit the captions editing tool without publishing the changes you’ve made, any changes you’ve made will be discarded.
Resetting captions
If you decide you would like to reset any changes you've made to auto-generated subtitles with the editing tool, you can do so by using the reset function.
Please note: taking this action will restore auto-generated subtitles to their original state, as they were when they were first uploaded by Udemy.
1) Click Captions on the left hand side of the Course Management page.
2) On the captions page, click the ellipses on the right hand side of the lecture you wish to reset the captions for.
3) Click Reset. The captions will be reset to the original auto-generated text.
Deleting captions
If you wish to delete a caption file you created and uploaded to a lecture, then click on the ellipses on the right hand side, and select Delete.
Note:
- Deleting a caption file cannot be undone.
- To align with our Udemy Business customers’ accessibility expectations, we will be requiring subtitles or captions for all courses in English, Spanish, Portuguese, French, and Italian courses in the Udemy Business collection. This excludes any language-learning courses.
Auto-generated subtitle files cannot be deleted. They can either be edited, by following the steps outlined above, replaced with a caption file you’ve created and uploaded, or disabled in bulk by clicking the “Disable” button on your Captions page.
-
Instructors: Auto-Generated Subtitles Frequently Asked Questions
Read articleAs part of Udemy’s plan to expand the global reach of instructors, and help make course content more accessible to students around the world, Udemy provides auto-generated subtitles for thousands of courses.
- Learn more about creating accessible learning content.
This article includes answers to the frequently asked questions we receive from instructors, regarding the automatically generated subtitles program.
Frequently asked questions
- How are the automatic subtitles created?
- Which course languages are the auto-generated subtitles being created for? And when will they be added to my course?
- Once my course has received auto-generated subtitles, if I publish a new lecture video, will they receive auto-generated subtitles as well?
- Will I be notified when my course has received automatically generated subtitles?
- How will the auto-generated subtitles be indicated on the course landing page?
- Can I edit the auto-generated subtitles myself?
- Can I still upload my own captions to my course?
- Can I disable the subtitles for my course?
- It says the automatically generated subtitles were disabled due to “low quality”. How is this determined?
- Can I request auto-generated subtitles in other languages?
How are the automatic subtitles created?
The automatically generated subtitles are generated using speech recognition technology.
Which course languages are the auto-generated subtitles being created for? And when will they be added to my course?
English, French, German, Italian, Japanese, Spanish, and Portuguese auto-generated subtitles will be generated for non-language learning courses instructed in these respective languages.
The auto-generated subtitles will be created for the course after it receives 20 or more enrollments on the marketplace.Once my course has received auto-generated subtitles, if I publish a new lecture video, will they receive auto-generated subtitles as well?
Yes. New videos that are published in your eligible courses will receive auto-generated subtitles.
Will I be notified when my course has received automatically generated subtitles?
Yes. Once auto-generated subtitles have been added to your course you will be notified on the Captions page, and you will also receive a notification in the notifications bell.
How will the auto-generated subtitles be indicated on the course landing page?
If a course has received auto-generated subtitles, then “auto-generated” will appear beside the captions icon on the course landing page. If a significant amount of the auto-generated subtitles are edited by the instructor, however, then “Auto-generated” will be removed from the captions icon.
Learn how to use the captions editing tool.
Can I edit the auto-generated subtitles myself?
Yes. If you would like to improve and edit the auto-generated subtitles that were generated for your course, you can do so by using the captions editing tool. Learn how to use the captions editing tool.
Can I still upload my own captions to my course?
Yes. Instructors can still upload and use captions they’ve created for the course, and these captions will be utilized instead of the auto-generated subtitles. Learn how to add captions to your videos.
Can I disable the subtitles myself?
Yes. If you wish to disable the subtitles for your course, you can do so by clicking on Disable at the top right hand of the Captions page.
Please note:
- Disabling the subtitles will also disable transcripts for the course.
- To align with our Udemy Business customers’ accessibility expectations, we will be requiring subtitles or captions for all courses in English, Spanish, Portuguese, French, and Italian courses in the Udemy Business collection. This excludes any language-learning courses.
It says the automatically generated subtitles were disabled due to “low quality”. How is this determined?
Subtitles can receive a low quality rating for several reasons, some of which include poor audio levels in the video lecture, background noise, or unrecognizable words. In these cases, the automatic subtitles will be disabled. Students that specifically requested the subtitles due to a hearing impairment, however, will still be able to utilize them.
Instructors can re-enable the subtitles by downloading the caption file, editing it in a text editor, and then re-uploading it to the associated lectures. Steps on how to do this are posted above.
Can I request auto-generated subtitles in other languages?
At this time, we are unable to generate subtitles in additional languages other than the ones included above.
-
How to create assignments for your course
Read articleThis article provides an instructor overview of the assignments feature and outlines how to add and edit assignments for your course.
Table of contents
- What are assignments?
- Create an assignment
- Edit an assignment
- Basic Info
- Instructions
- Questions
- Solutions
- Publish an assignment
- Reviewing Answers and Providing Feedback
What are assignments?
The assignments feature provides instructors with a comprehensive way for learners to apply the knowledge and skills they’ve gained in your course with a real-world application.
With assignments, instructors can create various questions for users to answer regarding the course concepts. In addition, instructors can upload instructions and solutions in video format, share downloadable resources, and provide feedback on learners’ completed assignments.
After users complete the assignment, they can compare their work with the instructor’s solutions and receive feedback from their fellow users if they wish.
Create an assignment
1. Navigate to the Curriculum page (Learn how).
2. Hover your cursor over the grey space between the course items and click the + icon. You can also click on + Curriculum Item at the bottom of each section.
3. Click Assignment. Then, add the title of the assignment and click Add Assignment.
Edit an assignment
After adding an assignment, click on the pencil icon to access the assignment’s editing features.
Basic info
On the Basic Info page, you can update the assignment’s Title, Description, and Estimated duration for students to complete the assignment (in minutes).
Once you have entered the basic information, click Save to proceed.
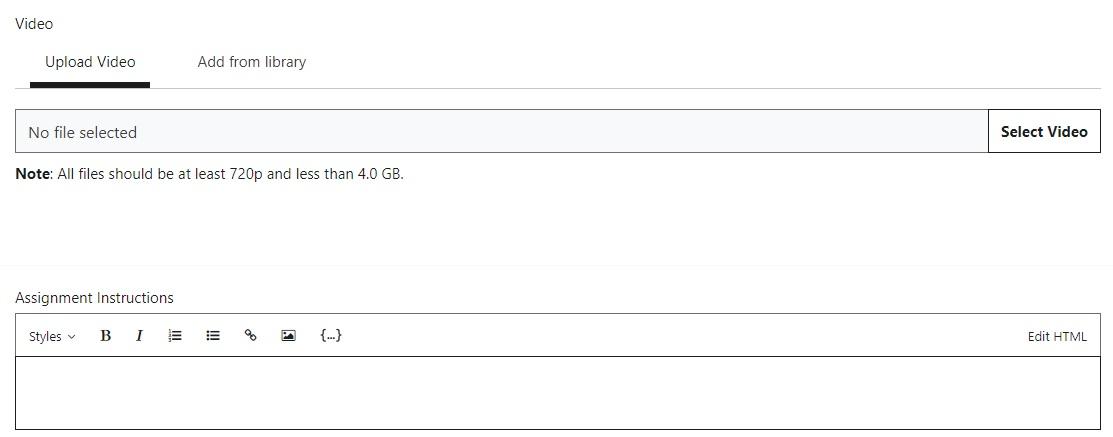
Instructions
On the Instructions page, you can enter the assignment instructions in video or text format. If you include both, the text instructions will appear below the video.
The instructions should describe the activity, the purpose of the assignment, what your users need to do, and list any materials that are needed to complete it.
You can also upload any downloadable resources here that users can use to complete the assignment.
Please note: Instructions must be 65K characters or less. Images that are to be uploaded by a student for their submission must be smaller than 30 MB in size, and can be in .JPG, .PNG. or .BMP file format.
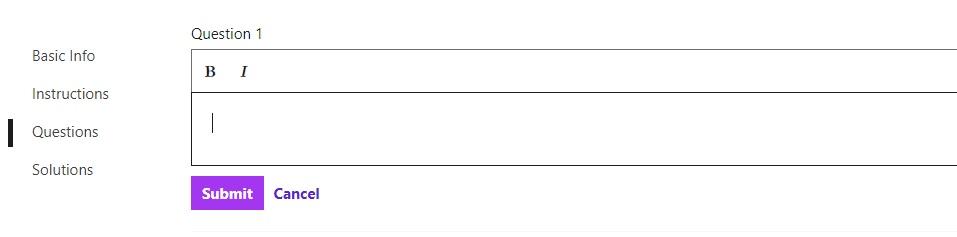
Questions
On the Questions page, you can create questions for the assignment. Each assignment must include at least one question, and you can add up to 12 questions.
Once you have finished entering the first question, click on Submit. Click Add more to create additional questions.
After you’ve finished creating the assignment’s questions, click on Solutions on the left menu.
Solutions
On the Solutions page, you can add answers to each of the submitted questions. A video explanation or downloadable resources can also be added to this page.
Click on Add answer below each question. Once you’ve entered the solution, click Submit.
Publish an assignment
Once you have completed the above sections, click Publish. You can continue making edits even after the assignment has been published by following the above instructions.
- Learn how to preview the assignment from the course curriculum
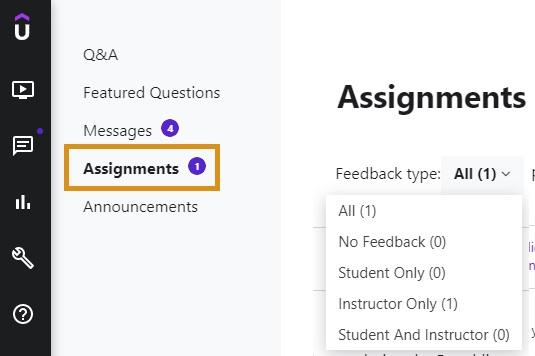
Reviewing answers and providing feedback
After a user has completed an assignment, you can review their answers and provide feedback.
1. Click on Communication on the sidebar menu on the left. Then, click Assignments
2. Assignments that are completed and submitted will appear on this page. You can use the various filter options to sort through the responses.
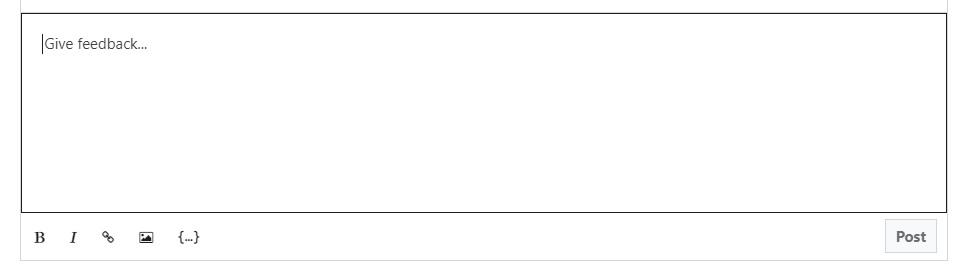
3. To provide feedback, enter your response in the Give Feedback section. Then, click Post.
4. To add additional comments, write your response in the Enter your comment section, and click Submit.
-
How to Add Questions to a Practice Test
Read articleThis article outlines how instructors can add questions to practice tests they’ve added to their course curriculum, or practice test courses they’ve created.
- Review the differences between a practice test and a practice test course, and how instructors can create them.
- Learn how to access and review practice test insights.
Table of contents
- How to add questions to a practice test
- Adding questions individually
- Using the bulk question uploader
- Editing or deleting questions individually
- Generating answer explanations with Udemy’s AI tool
- Previewing and publishing the practice test
- Unpublishing a practice test
How to add questions to a practice test
1. If you exited the planning or editing process previously, after adding a practice test to the curriculum, click the pencil icon beside its title.
2. Click the + icon to begin adding questions to the practice test.
3. Select the type of question you wish to create (Multiple choice, Multiple selection or Fill in the blanks), or Bulk upload if you wish to import multiple questions to your course at once.
Please note: Each practice test can include up to 250 questions.
Adding questions individually
1. After selecting either the Multiple choice, Multiple selection or Fill in the blanks options, follow the directions on the corresponding page to enter the question and answer(s).
For multiple choice and multiple selection questions, select the correct answer(s) by clicking on the circle or rectangle to the left. For these types of questions you can also use the AI option to generate answer explanations (see below for more information).
- For multiple choice and multiple selection questions, click Add answer option if the question requires additional answers. Up to 6 answers can be added for each question.
- To enter a blank field for a fill in the blank questions, add two (2) underscore symbols (__) before and after your selected word. For example: __Mercury__ is the smallest planet in our solar system.
- If you'd like to provide learners with additional information or context about the question, you can add resources and domains by clicking the applicable option.
-
Pro tip: When learners interact with your practice test in “practice mode”they can select a domain to focus on. Make sure all of your questions have a domain assigned to create a smooth learner experience.
-
2. Finally, click Save question and repeat the steps above to add more questions.
Editing or deleting questions individually
If you need to edit a question you previously created and saved, follow the steps outlined above to access the practice test and select the applicable question. After updating the question, click Save question. If you are editing a published practice test, click Publish changes if you want learners to access the updated content.
If you need to delete a question, click Delete at the top of the page.
Generating answer explanations with Udemy’s AI tool
1. Instructors can also use Udemy’s AI tool to quickly draft explanations for the answers that have been entered. To use the AI tool, simply click Generate all answer explanations with AI.
Please note:
- By using this functionality, you're agreeing to the additional terms.
- This tool is available in select languages. Learn more about supported languages for Udemy's GenAI tools.
- Currently, the AI tool can only generate answer explanations for courses that are in the Development category or the IT Certifications sub-category. We hope to support more languages and categories soon.
2. After the explanations have been generated, you can either accept each response, edit it, or dismiss it. If you need to make changes to the questions and answers, and require new explanations, click Generate again.
Using the bulk question uploader
Instructors can use the Bulk upload option to import an existing set of questions into the practice test.
1. After selecting the Bulk upload option by following the steps outlined above, access the CSV template and format your questions according to the document.
- Note: As of May 2, 2024, instructors can still upload questions to previously created practice tests using the previous version of the CSV template if they wish. Please be advised that the previous CSV template will be phased out in the coming weeks, and the new CSV template will be required for all bulk question uploads.
Please note: To avoid uploading errors, be sure to use the same format that's on the template.
- Your completed document must retain the same number of columns on the template (even if they're not used).
- The formatting for the column titles cannot differ from the formatting used in the template.
- The Question Type column must include the question type exactly as they're listed on the template. For example: multiple-choice must be written in the cell in this format with the hyphen and casing.
3. Click Upload CSV file and upload your file.
Previewing and publishing the practice test
To see how the practice test will appear to learners before publishing it, click Preview at the top of the page. If the practice is complete and ready to be taken, click Publish. If you are updating a published practice test, click Publish changes.
Unpublishing a practice test
Review how to unpublish a practice test.
-
How to create a coding exercise
Read articleCoding exercises are an interactive tool you can add to your programming courses, so your learners can get practical coding experience. This article outlines how instructors can add a coding exercise to their course curriculum.
Table of contents
- Which programming languages are available?
- How to add a coding exercise to your course curriculum
- How to create a coding exercise
- How to create the exercise solution and evaluation files with Udemy’s AI tool
Which programming languages are available?
Instructors can create coding exercises in various languages, some of which include C++, C#, Java, Python, Ruby, Swift, Web Development and PHP, among others. Review all the programming languages that are available for coding exercises.
How to add a coding exercise to your course curriculum
Before you can enter the exercise’s solution, the first step you’ll need to take is to add a coding exercise to your course curriculum.
1. Navigate to the Curriculum page of your course.
2. Within a section, click + Curriculum item and then select Coding exercise.
3. Enter the exercise’s title and then click Add Coding Exercise.
4. Plan and create the exercise you would like learners to solve by following the steps outlined in the section below.
How to create a coding exercise
Once you’ve added the coding exercise to your course curriculum, you can create the exercise by following the steps below. For advice and best practices on creating coding exercises, please review this Teaching Center resource.
1. Move your cursor to the exercise title and click on the pencil icon that appears to begin creating the exercise.
2. Select the programming language for the exercise.
3. On the Plan exercise page, re-enter the exercise title as well as its learning objective (optional) .
4. Next, create the solution on the Author solution page. Enter the solution in full, which includes the evaluation and solution file. You can enter your own solution or select an example solution from the View examples, which can be accessed at the top of the screen.
Please note: Depending on the programming language for the exercise, you may be able to use AI as an assistive tool to help you draft the exercise solution and evaluation files. Please review the section below regarding the AI tool for more information.
5. After creating the solution, clearly communicate the purpose and problem of this exercise on the Guide learners page, and author the Learner file. A Learner file is the code that is needed at the beginning to frame the exercise to keep the learner focused on the targeted skill.
6. In addition to inputting the code and solution for the exercise, you can provide related lectures, as well as hints, which learners can revisit to get more information on how to solve the problem.
You can also write a detailed explanation for the Instructor solution to highlight key concepts that learners can review to help comprehend the exercise and solution.
Depending on the programming language for the exercise, you can also select Run code to view the output of your code before running a test.
7. Next, check the exercise’s solution by clicking Run tests at the bottom of the page.
8. If the solution is correct, click Save at the top right hand of the page, and then Publish to make the exercise accessible to learners. You can also preview the coding exercise by clicking on Preview.
Please note: coding exercises will only appear published in the curriculum of published courses.
If the course is not published, then a checkmark will not appear beside the coding exercise when it's been added to the curriculum.
How to create the exercise solution and evaluation files with Udemy’s AI tool
Instructors can also quickly use Udemy’s AI tool, powered by a third party LLM and made available on a limited basis, as an assistive tool to help draft the solution and evaluation files for eligible coding exercises (e.g., Python, C++, Java and Web Development). Note that by using this functionality, you're agreeing to the additional terms.
- Please note that currently this feature is available for coding exercises in select languages. Learn more about supported languages for Udemy's GenAI tools.
To create a solution or evaluation file using this AI tool, please follow the steps below:
1. After you’ve started creating a new, eligible, coding exercise following the instructions outlined above (steps 1-5), click Generate with AI at the beginning of the files section.
2. Within seconds, you will see a draft exercise, a solution, and evaluation files generated for your exercise.
3. Review carefully and make any changes. Note that by default, the exercise file (the code learners will see in the console when they begin the exercise) will match the solution file. You'll need to decide how much of the solution to keep as a starting point for your learners.
4. Click Save and then Publish.
Please note that the Generate with AI feature can be used up to 50 times, per user, within a 24 hour period.
-
Using Code Blocks and Inline Code
Read articleUdemy now supports syntax highlighting for code blocks and inline code within the Questions and Answers, Quizzes, and Articles.
How to Add Inline Code
Inline code is great to use when you want to highlight a short snippet of code (for example: the definition of a function or the name of a variable) inside a paragraph.
- Navigate to the question or answer box where you want to add your code. If you want to attach your code to a question, type your question first.
- Then click, Ask a new question
- Fill in what you want to say
- Highlight the portion that you want to change to inline code
- Click on the inline code icon in the tool bar
- Click either Post Question or Add an answer
How to Add Code Blocks
Code blocks are great when you want to highlight multiple lines of code.
- Navigate to the question or answer box where you wish to enter your code block
- If you want to attach your code to a question type your question first.
- Enter the code block you wish to include and highlight it
- Click on the inline code icon in the tool bar
- Then click either Post Question or Add an answer
- Your inline code should be nicely highlighted!
Where to Use Code Blocks And Inline Code
Questions & Answers - Highlighting your code inside questions and answers makes it easier and faster for students to read it and share their feedback.
Quizzes - Highlight your code in the questions of a quiz and in the answers. This allows instructors to ask questions such as “Which is the correct way to solve this problem?” and prompt students to choose the correct answer from a set of different implementations.
Articles - Highlight your code in articles so that students can easily read and learn from it. -
Understanding Curriculum Items for Your Course
Read articleThis article provides an overview of the lecture types and practice activities available on the Curriculum page when creating your course.
- Explore our recommended processes for creating, publishing, and managing courses.
- See how you can enhance your course with practice activities.
Adding curriculum items to your course
- Learn how to navigate to the Curriculum page for your course.
- Review the supported file types for lectures and resources.
You can add these curriculum items to your course:
- Lecture (Video, Video & Slide Mashup, or Article)
- In-course lab
- Quiz
- Coding exercise
- Assignment
- Practice test
- Role Play
Video lecture
Use the Video lecture option when your lecture consists of a video file only. You can tailor your videos to suit the needs of your course, such as on-camera introductions ("talking head" videos) or narrated slideshow presentations.
- Learn more about video standards for Udemy courses.
- Review resources for recording and editing videos.
Video & Slide Mashup lecture
You can use the Video and Slide Mashup lecture option to combine a video file with PDF slides, allowing learners to easily view text resources and videos at the same time.
Article lecture
You can use the built-in text editor on the Article lecture option to provide text and images. For example, to introduce an activity or summarize a section.
In-Course Lab
After adding a video to your lecture, you can add an in-course lab to allow learners to practice technical skills in real environments called workspaces. In-course labs consist of video instructions, lab tasks, and technical workspaces.
- Review examples and best practices for in-course labs.
- Learn how to add in-course labs to your course.
Quiz
Quizzes, which consist of multiple choice questions, help learners reinforce their understanding of the course content. You can create quizzes directly on the Curriculum page, and link them to related lectures to enable students to easily review the material.
Coding Exercise
Coding exercises are interactive activities you can create for your programming courses, allowing learners to practice what they’ve learned.
Assignment
Assignments allow you to create question-based tasks for learners to apply the knowledge they’ve gained in your course. Assignments can include text or video instructions, as well as downloadable resources.
After a user completes an assignment, you can review their answers and provide feedback. Learners can also:
- Compare their answers to the solutions you provide.
- Receive feedback from fellow learners.
Learn how to create assignments for your course.
Practice Test
For courses that prepare learners for third-party certification exams, you can create comprehensive tests that mirror the actual exam. Practice tests provide learners with an opportunity to assess their readiness and to become familiar with the exam format.
Note: Due to the unique and proprietary nature of many practice tests, they can only be added to paid courses.
Role Play
Role Plays enable learners to practice their skills by engaging with an AI character in realistic scenarios. Adding a Role Play to your course provides learners with the opportunity to actively engage with the course content and receive targeted feedback.
-
How to add sections, lectures, and video content to your course
Read articleUdemy courses are structured into learning sections, which are used to divide the course content by topics. Each section can contain curriculum items like lectures, quizzes, coding exercises, practice tests, and assignments.
Please note:
- Instructors can create up to 1400 curriculum items for a course (sections, lectures, quizzes, coding exercises, practice tests, and assignments), and 800 of those items can be published at any given time.
- Images that are to be added to lectures, must be uploaded into the Udemy platform directly, and cannot be externally linked.
- Udemy employs anti-piracy technology, including encoding videos using a proprietary player and attaching a Udemy watermark to all videos. As a result, the course videos cannot be downloaded in their original format. To ensure instructors have access to their original course materials, we ask that instructors keep copies of their course videos and files in their own computers and devices.
This guide outlines how you can add sections, lectures, and video content to your course.
- How do I add a section to my course?
- How do I add a lecture to my course?
- How do I add content to my lecture?
- How do I add resources to course lectures?
How do I add a section to my course?
To help students better understand how a Udemy course is organized, all lectures in a course should be contained in a section. To add a section to your course please follow these steps:
1. Navigate to the Curriculum page in your course management tools.
2. Click the + Section icon.
3. Enter a title for the section in the designated blank, and as an optional step, add a learning goal that students will achieve in the section (in the blank space under “What will students be able to do at the end of this section?”).
4. Click Add Section.
If you need to move the section into a different spot in the course curriculum, simply click on the section and drag it to the new location.
How do I add a lecture to my course?
1. Navigate to the Curriculum page in your course management tools.
2. Click the + Curriculum item icon within the section to add the lecture.
3. Next, select the type of curriculum item you want to add. In this case select Lecture.
Please note: you’ll see other curriculum item formats like Quiz, Practice Test, Coding Exercise, and Assignment here too, but this article focuses specifically on the Lecture format.
4. Enter a title for the lecture.
5. Click Add Lecture.
If you need to move the lecture into a different spot in the course curriculum, simply click on the lecture and drag it to the new location. If you have a lecture that exists outside of a section, move it to an existing section, or create a new section that’s appropriate for it.
How do I add content to my lecture?
For a new course, all added lectures must have content before you submit the course for review and publication. To add content to a lecture please follow the steps below:
1. Click the + Content button that appears on the lecture item
2. Select the type of content you want to add to the lecture. Article lectures will contain only text, entered from a rich-text editor. Mashup lectures are synced combinations of pdf’s and video. The following steps cover the most common content type on Udemy for lectures, Video.
3. After selecting Video, click Upload to select the appropriate video file from your computer (.mp4, .mov, or .wmv files are supported, and video files should be at least 720p and less than 4.0 GB). If you used the Bulk Uploader to add files, you can choose the tab that says Add From Library.
Please note: do not close the curriculum page until the status bar for the video reaches 100% and the status changes to “Processing”.
Review troubleshooting steps to follow if your video won't upload or finish processing.
4. If your course is still in draft your lecture will be automatically published when you submit your course for review. If you’re adding a lecture to a course that is already published, however, click Publish on the right-hand side of the lecture item.
How do I add resources to course lectures?
-
Adding Captions to Your Videos
Read articleAdding captions to your video lectures is a great way of increasing student engagement and accessibility for your courses. This article outlines how you can create, add and manage captions for your course, and how you can edit auto-generated captions that have been added to your lectures, if required.
Auto-generated subtitles program
As part of Udemy’s plan to expand the global reach of instructors, and help make course content more accessible to students around the world, Udemy provides auto-generated subtitles for thousands of courses. Learn more about Udemy's subtitles program.
Creating captions
There are a few ways that you can create captions for courses. Udemy relies on .vtt files for caption uploads, so any method you use will need to create a .vtt file (please note that captions are not a simple transcript or script of your course, but must be in this specific file format).
You can create .vtt files from scratch, using a simple text editor, or you can use free captioning software or paid services. We recommend searching online for more information regarding how to create captions or using captioning software and services.
How to upload captions to your Udemy course
Once you have prepared the .vtt caption files, you can upload them to your course lecture by following the steps below:
1. Navigate to the Course Management page and click on Captions on the left-hand side
2. At the top of the Captions page, select the language of the captions that you are uploading
3. Move your cursor to the video lecture that you have created captions for, and click on the upload icon
4. Once the caption has been successfully uploaded, the .vtt caption file will be visible
How to edit captions
Learn how to use the captions editing tool.
How to delete a captions file
If you wish to delete a caption file you created and uploaded to a lecture, then click on the ellipses on the right hand side, and select Delete. Please note that deleting a caption file cannot be undone.
How to disable or enable the captions
If you need to disable all of the existing captions for a specific language, you can quickly do so by following these steps:
1. Navigate to the Captions page
2. Select the language of the captions that you wish to disable
3. Click Disable on the right-hand side
To enable the caption files, simply follow the steps outline above and click on Enable. Please note: in order to make the Enable icon active, each lecture on the Captions page must have a .vtt file uploaded to it.
-
-
Adding Lecture Descriptions
Read articleOnce you've added a lecture to your course you will be able to add a description. The lecture description describes what learners should expect to learn in the lecture.
- Learn how to add lectures to your course.
Please note: the lecture description is only visible to potential learners on the course landing page, and will not be shown to enrolled learners on the course dashboard page.
Adding a description
1. Navigate to the course Curriculum page in your course management tools.
2. Click the arrow on the right to view the lecture details.
3. Click +Description.
4. Type a description and click Save
-
Converting a Presentation to a Video Lecture
Read articleThis article outlines how you can convert presentations from Powerpoint and Keynote into video lectures for your course.
Resources for converting your presentation
Instructors can use presentations from PowerPoint or Keynote to create video lectures for their courses, provided they include audio narration and are converted into a video file format (.MP4, .WMV, or .MOV files).
Below are resources to convert a presentation to a video lecture.
Please note: These external resources are provided as a helpful reference for instructors and the corresponding content is not managed by Udemy. If you have any questions about these resources, please contact the applicable company directly. These resources may not be available in each Udemy account language.
Powerpoint
Keynote
-
Create a quiz for your course
Read articleAdding a Multiple Choice or Multiple Selection quiz to your course allows students to assess themselves as they learn course material. You can add a quiz to the course curriculum directly and it will appear in the course outline, where potential students can view your course.
Creating a quiz
1. Navigate to the Curriculum page of your course.
2. Within a section, click + Curriculum item and then select Quiz.
3. Name the quiz, add a description, and click Add Quiz again
Adding questionsAfter creating a new quiz, it's time to add multiple choice or multiple selection questions.
1. Click Questions. Then, choose between the following quiz types:
- Multiple Choice: Learners will choose a single correct answer from a set of options.
- Multiple Selection: Learners can select more than one correct answer from the available choices.
2. Write the question you want to ask. You can even add an image if you wish
3. Enter the possible answers for the answer. You can add up to 15 choices.
4. Indicate the correct answer by pressing the bubble next to one of the multiple choices, or at least two of the checkboxes for multiple selection.
5. Recommended: Explain why the answer is or isn't the best answer
6. Click Save
7. To add another question to the quiz, click New Question, and repeat the same steps outlined above
Related lecture
To further help students, you can link a quiz to a specific lecture. With a related lecture, a student can return to a previous lecture and review material. Add a related lecture by clicking the dropdown menu under Related Lecture. The related lecture will only appear after a student has submitted their answer.Editing a quiz
Quizzes can be edited at any time.
Hover your mouse over a question. An icon will appear:
- Edit - Clicking the pencil icon will allow you to modify quiz questions.
- Delete - The trashcan icon will permanently erase a quiz question.
- Move - The icon with the three lines will allow you to drag and drop questions.
Previewing and publishing your quiz
When you're finished writing the quiz, click Publish to add it to your course. You can also preview the quiz as a student. You will not be able to submit responses, but you can see what the quiz will look like visually when students are taking the course.
-
Create a Video-PDF Mashup Lecture
Read articleA mashup lecture includes both videos and PDF slides, and allows students to easily view text resources and videos at the same time. This article outlines how instructors can create and add this type of dynamic lecture to their courses.
Adding a Mashup Lecture to the Course Curriculum
1. Navigate to the Curriculum page in your course management tools.
2. On the side, hover your cursor over the grey space within a section, where you want the mashup lecture to be placed. Click the + icon that appears.
3. Select Lecture, enter a title and click Add Lecture.
4. Next, click the +Content button that appears on the lecture item.
5. Select Mashup.Uploading the Lecture Content
After adding the mashup placeholder to the curriculum, it's time to add the lecture’s content. Mashups are created with a video file and a PDF document (please note that the file uploads are limited to 1.0 GB).
You can follow the steps below to add PDF slides and a video to your mashup lecture:
1. Add a video and PDF to the lecture by clicking upload video and upload PDF file (currently videos and files can only be added to mashup lectures via the browser uploader, and not the bulk file uploader). Once the files are uploaded they will begin processing. Depending on your internet connection speed, the files should take about 5 minutes to process.
Please note: in order for the video and slides to finish processing, the curriculum page must be kept open in your browser.
2. Once the files have finished uploading, select the slides you wish to use, by clicking on the slide arrows or dashes below
3. Next, click Use this Video and Use this Presentation when you're ready to continue
Synchronizing the Video and PDF Slides
Once you have uploaded your video and PDF slide, you can synchronize the mashup lecture with the Text Editor. Add the slide and time in the format of the slide’s number, and the time you want it to appear in the video. Please note that the first slide must appear at the beginning of the lecture. Accordingly, 1, 0 must be entered for the first PDF slide. If you want the second slide to appear at say, the 20-second mark, then you would enter 2, 20. If you enter 6, 420, the sixth slide in the presentation will appear at the 8-minute mark (420 seconds).
You can also use hh:mm:ss format (2:05) to time the appearance of the slides.
When you're finished synchronizing the slides with the video, click Continue & Preview. If you're satisfied with how everything looks, click Save & Continue. If you’re adding the lecture to a published course, then you will need to click on Publish in the Course Curriculum, in order to make it live.
Below is an example of how a finished mashup lecture will appear, when the video is selected for the foreground.
If a student clicks on the slide image on the bottom right, then the slide will switch places with the video, and will appear in the foreground.
Please note: video-PDF mashup lectures are not supported by the preview function, and as a result, we recommend instructors do not select them for a course's Free Preview.
-
Adding Resources to Lectures
Read articleAdding resources to course lectures is a great way to add value to your course, and improve the learning experience of students. The article outlines what types of resources can be added to lectures and how instructors can do so.
- Learn how to create a lecture.
Please note: resources must be free, related to your lecture topic, and in no way promotional.
Types of resources
Below are the types of resources that can be added to course lectures.
Downloadable resources: these resources can be any filetype like .JPG, .PDF, .ZIP, .XLS, .MOV, .MP3, etc. Unfortunately, source code like .HTML, .JS, etc., cannot be uploaded directly, but these files can be uploaded in a .ZIP file.
The maximum upload size for any individual file is 1 GB, but there is not a limit to the number of files you can upload. Files can be uploaded to your course directly, or added from your library using the Bulk File Uploader.
External resources: these resources are hyperlinks to free websites.
Source code: for development courses, only Python and Ruby files can be uploaded at this time.
Accessible resources
Adding resources to courses that meet accessibility standards is a great way to increase student engagement and accessibility for your courses. Learn more about creating accessible learning content.
How to add resources to a lecture
In order to add a resource to a lecture, you will need to create the lecture first, and add content to it.
Once you're ready to add resources, please follow these steps:
1) Navigate to the course Curriculum page.
2) Click the dropdown arrow on the right hand side of the lecture.
3) Click +Resources.
4) Select whether the resource is a Downloadable File, an External Resource, a Source Code or if it's being added from your library. Then, click Select File. If you're adding an External Resource, then enter the resource's title and URL.
If you want to upload multiple resources, upload a .ZIP file for your students to download.