-
Instructors: Udemy ChatGPT App FAQ
Read articleThis article provides instructors with answers to frequently asked questions regarding the Udemy ChatGPT app.
The Udemy ChatGPT app allows learners to search for Udemy courses directly within ChatGPT. Learners can look up a topic, view course search results, watch preview videos, and explore course curriculums. If a learner is interested in a course, they can click through to Udemy.com to purchase it or to subscribe to a Udemy Plan.
Table of contents
-
Visibility and course recommendations
- Will all my courses be available through the ChatGPT integration?
- How are course recommendations determined in the ChatGPT app?
- Can I preview how my course appears in the ChatGPT interface?
- Will courses from all languages be recommended in ChatGPT?
- Do Udemy Business-exclusive courses appear in ChatGPT?
- Will ChatGPT show multiple course options or just one recommendation per query?
- Can I use promotional tools (coupons, announcements) that affect ChatGPT visibility?
- Instructor revenue
-
Content usage
- How much of my course content is accessible within ChatGPT before enrollment?
- Can ChatGPT's AI summarize or paraphrase my course content?
- Can OpenAI use my course content to train their AI models?
- Can I opt in or opt out of having my courses shown in ChatGPT?
- Does this integration change any terms regarding my course content and IP rights?
- What safeguards are in place to prevent unauthorized reproduction of my content?
- Analytics and insights
Visibility and course recommendations
Will all my courses be available through the ChatGPT integration?
The Udemy ChatGPT app may recommend any public course.
How are course recommendations determined in the ChatGPT app?
Similar to the Udemy website, recommendations will depend on factors such as user query, relevance to the keywords in the course title, course metadata (for example, course title, instructor name, and the list of curriculum items), ratings, and so on. A key difference is how the query is formed through the ChatGPT app: based on the user’s natural language prompt and conversational context.
Can I preview how my course appears in the ChatGPT interface?
Currently, there’s no instructor preview functionality for this feature.
Will courses from all languages be recommended in ChatGPT?
Yes, all courses may appear in ChatGPT recommendations if they match the learner’s query and language context.
Do Udemy Business-exclusive courses appear in ChatGPT?
No, the Udemy ChatGPT app only surfaces courses publicly available in the Udemy marketplace.
Will ChatGPT show multiple course options or just one recommendation per query?
Multiple recommendations may be shown depending on the user’s query.
Can I use promotional tools (coupons, announcements) that affect ChatGPT visibility?
Promotions impact conversion on Udemy, and don’t impact ChatGPT recommendations.
Instructor revenue
Do I earn the same revenue when learners enroll after finding my course through ChatGPT?
Yes, while learners may discover your course through the Udemy ChatGPT app, any purchases will still take place on Udemy.com and therefore follow the standard marketplace rules.
Content usage
How much of my course content is accessible within ChatGPT before enrollment?
The Udemy ChatGPT app only surfaces standard previews and course metadata (for example, course title and instructor name), and doesn’t include full lesson content.
Can ChatGPT's AI summarize or paraphrase my course content?
ChatGPT only uses publicly available course information and previews. To ensure the summaries are accurate, we recommend ensuring your course information is up to date. If you update your course information, the ChatGPT responses will automatically reflect the new information when the data refreshes.
Can OpenAI use my course content to train their AI models?
No, Udemy content is not used to train OpenAI models.
Can I opt in or opt out of having my courses shown in ChatGPT?
Participation follows existing Udemy distribution terms, therefore, it’s not possible to opt out of courses appearing in ChatGPT recommendations.
Does this integration change any terms regarding my course content and IP rights?
No, your instructor terms remain unchanged.
What safeguards are in place to prevent unauthorized reproduction of my content?
Only previews and course metadata (for example, instructor name or course title) are exposed on ChatGPT; full content remains protected.
Analytics and insights
Will I be able to see which learners came from the ChatGPT integration?
At this time, referral source attribution is aggregated and not individually labeled.
-
Visibility and course recommendations
-
Performance: Content Quality
Read articleThe Content Quality dashboard can help you identify outdated content and maintain the quality across your courses through learner feedback data and AI insights.
This article explains how to navigate and use the Content Quality dashboard within your course Performance dashboard.
Please note: This feature is currently in beta, and is not available to all instructors at this time.
Table of contents
- About the Content Quality dashboard
- How to access the Content Quality dashboard
- Content Quality page features
- Access Flagged feedback
- Manage Feedback Status
- What is Fast Feedback?
About the Content Quality dashboard
The Content Quality dashboard provides you with an overall view of potential quality issues within your courses, allowing you to understand what to update for a better learning experience.
You can review dashboard metrics to monitor your courses’ content quality, so you can better understand what to update or improve for a better learning experience.
Getting started
To ensure course owners and co-instructors can access the Content Quality dashboard, please make sure that:
1. All course owners and co-instructors who need access are opted into Udemy’s Instructor GenAI Program.
- Learn how to opt in or out of Udemy’s Instructor GenAI Program
2. Course owners enable the Performance permission for co-instructors in their course settings page.
- Learn how to manage co-instructor permissions and settings.
How to access the Content Quality dashboard
You can find the Content Quality dashboard as part of the Instructor Performance features:
1. Navigate to the course page (Learn how).
2. Click Performance on the left-hand side.
3. Select Content Quality.
Content Quality page features
On the Content Quality dashboard, you can view data on learner feedback and review flags on potentially outdated content.
The summary table provides a snapshot of how each of your courses is performing in terms of content quality. You can sort or filter this table to quickly find courses and address issues needing attention.
All learner feedback is analyzed daily. The algorithm runs once per day, and the last updated date appears in the interface.
The table includes the following:
Course name: The name of your course (clickable for deeper insights).
Avg. content age: An average calculated based on the age of each curriculum item in your course. This metric shows how old your course is, which may or may not signal outdated content depending on multiple factors, such as your subject domain.
- Please note: Though we understand that some domains are evergreen and don't need frequent updates, you can use this metric to understand the age of some courses compared to your other courses, to better create an action plan.
Course rating: Your course’s average rating, with recent changes over the past 30 days indicated.
Date created: When the course was created, or the date the instructor began creating a course on Udemy.
Last update: The most recent update to your course or content.
Flagged feedback: The number of feedback items flagged by the system for your review. You can learn more about this feature below.
Access Flagged feedback
The AI algorithm analyzes all learner input received through reviews, Q&As, fast feedback features, and AI assistant conversations, flagging feedback that contains signals about course quality.
Please note: The feature is currently focused on surfacing outdated content. We hope to expand to other categories, such as low-quality AI-generated content, audio problems, and readability issues, in the near future.
To view the flagged feedback, click on the flag number to view the list of flagged feedback for that specific course.
Flagged feedback features
The flagged feedback section includes the following information.
Flag details: Shows the learner’s feedback, the type of content (such as Q&A), and the curriculum item on which the feedback is given.
Status: Each flag can be marked as Open, Resolved, or Dismissed to help track your progress.
Date received: The date when the feedback was flagged.
Last update: Shows when you or another instructor last updated related course content.
Use the filters at the top of the page to view flags by source, status, or a specific date range. You can also use the dropdown at the very top to select a single course.
Manage Feedback Status
You can use the checkboxes located to the left of each piece of feedback to bulk select feedback items and update their status:
Dismiss: If you believe the AI flagged feedback inaccurately and there's no problem with your content
Resolve: If you've taken action and updated your content based on the feedback.
Both actions remove the flag, and the flag count updates accordingly.
We recommend visiting the dashboard frequently to monitor key quality issues and plan fixes.
What is Fast Feedback?
At the end of each section, learners are prompted to rate the section with a thumbs up or thumbs down, referred to as Fast Feedback.
These quick ratings are analyzed together with reviews, Q&A, and AI assistant conversations. When Fast Feedback suggests a potential quality or freshness issue, it will appear in the Flagged feedback section described above.
-
Understanding Differences Between Course Engagement and Revenue Report Minutes
Read articleThis article explains why instructors may notice a difference between the minutes shown in their Course Engagement page and those listed in their Revenue Report.
The minutes shown in the Course Engagement page may differ from those listed in an instructor’s Revenue Report. This is expected and due to the different purposes of these two reports.
- The Course Engagement page shows near real-time viewing data designed to give instructors insights into learner behavior and course performance. By default, the Course Engagement page includes minutes spent by any learner who has viewed your courses, including learners who are accessing the courses via a marketplace enrollment (free or paid), or who have viewed the content through a subscription. Learn more about the Course engagement page and the analytics it provides.
- The Revenue Report reflects an instructor’s earnings, which include finalized minutes that are eligible for subscriptions revenue. Review our Promotions Policy to learn more about how we calculate this revenue. More information regarding the instructor revenue report and how you can access it is available in this article.
The distinctions in these reports help ensure transparency in tracking engagement, while maintaining accuracy in instructor payouts.
-
Performance: Lab Insights
Read articleThis article explains how to navigate to your Lab insights page, which includes insights and performance data regarding how learners are interacting with your labs.
- Lab insights are available for instructors who have published a lab.
How to navigate to your Lab insights page
You can find the Lab insights page as part of the instructor Performance features:
1. Navigate to the Instructor view (learn how).
2. Select Performance on the left-hand side.
3. Under Engagement, select Lab insights.
Lab insights page features
On the Lab insights page, you can explore a wide range of data for any course with at least one lab.
Select the dropdown at the top to select any applicable course. Then, use the dropdown menu on the left to select the date range.
Select the Edit lab button to update your practice test based on the data you see.
Minutes consumed by learners
In this section, you can view the total minutes watched and the number of lectures started by learners over the selected time period.
Performance data
In the performance data, you can view lists of labs, the number of learners who began the lab, and the average completion rate.
You can use the dropdown to filter by the specific mode selected by the learner.
-
AI Assistant Insights for Instructors: Frequently Asked Questions
Read articleThis article answers frequently asked questions about AI Assistant Insights and its features.
- More information regarding the Udemy AI Assistant is available in our frequently asked questions.
Please note: The Udemy AI assistant is available in select languages. Learn more about supported languages for Udemy's GenAI tools.
Table of contents
- What are AI Assistant Insights?
- Which instructors can access the AI Assistant Insights page?
- How do I access the AI Assistant Insights page?
- How do I access insights for a specific course or lecture?
- What is an interaction?
- How are themes chosen?
- What if the sampled quotes don't match the theme?
- Why does my lecture not have any themes?
- How often is AI Assistant Insights updated?
- Why are there no insights or data for my course(s) in the dashboard?
What are AI Assistant Insights?
The Udemy AI Assistant is a virtual learning companion that guides learners on every step of their skills development journey.
The AI Assistant Insights gathers learner inputs to the AI Assistant and surfaces them in an easily digestible format. This gives instructors visibility into the types of questions learners are asking.
These insights are available for up to 5 lectures that receive the highest AI assistant engagement from learners by course, and are organized into themes based on learner inputs.
Which instructors can access the AI Assistant Insights page?
Only instructors participating in our GenAI program can access the AI Assistant Insights page.
Please note:
- Feature availability: Certain features may not be available to all learners. Learn more about Udemy AI assistant’s availability to learners.
How do I access the AI Assistant Insights page?
Eligible instructors can select AI assistant Insights through the Communication tab in the Instructor Dashboard.
For those not yet eligible, instructors can still access Q&A and Reviews insights.
- Learn how to access the Q&A insights
- Learn how to access the Course Reviews insights
How do I access insights for a specific course or lecture?
To access insights for a specific course or lecture, navigate to the AI Assistant Insights page. Use the dropdown menu at the top of the page to select your desired course.
Once a course is selected, the five lectures with the highest AI Assistant learner interactions will appear on individual cards. Click on each card to view insight themes and sampled quotes from those themes.
You can also use the Watch Lecture or Edit Lecture buttons to view or update your content directly from the dashboard based on user insights.
What is an interaction?
An interaction is any input a learner enters into the AI Assistant chat box during your course lectures.
How are themes chosen?
Our intelligent machine learning model analyzes the interaction data for all eligible interactions and identifies clusters of recurring topics. We provide up to ten examples of anonymized quotes from each theme. Depending on the data, themes may range from closely aligned to broader topics.
What if the sampled quotes don't match the theme?
When we analyze learner interaction data, we identify broad recurring themes and provide a sample of paraphrased quotes. This approach offers a deeper insight into learners' questions. While most sampled quotes should closely align with the themes, some may be more loosely related.
Please note: Learner interaction quotes shared in your AI Assistant Insights are paraphrased to protect learner anonymity.
Why does my lecture not have any themes?
If your lecture doesn't have any themes, it's because there hasn't been enough learner interaction to identify recurring topics within the set time frame. As learner engagement increases, themes will become visible.
How often is AI Assistant Insights updated?
The AI Assistant Insights page is updated on a daily basis.
Why are there no insights or data for my course(s) in the dashboard?
If you aren't seeing any data in your dashboard, the AI Assistant may not have enough learner interaction volume to analyze and display as insights.
- Over time, you may notice an increase in learner interactions and more data in your Insights tab.
- Meanwhile, ensure your selected timeframe for insights is set to All Time to gather as much information as possible.
-
Performance: Practice Test Insights
Read articleThis article explains how to navigate to your Practice test insights page, which includes numerous metrics about how learners are interacting with your practice tests.
- Practice test insights are available for instructors who have published a practice test. Learn how to create a practice test.
Table of contents
- How to navigate to your Practice test insights page
- Practice test insights page features
- Overall test stats
- Performance funnel
- Version history
- Question analytics
- Flexible date range selector
- Inconsistent data error
- Question quality
How to navigate to your Practice test insights page
You can find the Practice test insights page as part of the instructor Performance features:
1. Navigate to the Instructor view (learn how).
2. Select Performance on the left-hand side.
3. Under Engagement, select Practice test insights.
Practice test insights page features
On the Practice test insights page, you can explore a wide range of data for any course with at least one practice test. Select the dropdown at the top to select any applicable course.
Then, use the date range picker to choose preset timeframes or pick your own custom date range.
If you have practice tests included in the Udemy Business content subscription, metrics for Udemy Business learners are included in the Practice Test Insights data.
1. To view performance data specific to Udemy Business learners, select the Udemy Business tab near the top of the page.
2. Select the “Edit practice test” button to update your practice test based on the data you see (learn how).
Overall test stats
The average number of attempts section shows you the average number of times learners re-take the practice test and the number of learners this metric is based on. This is calculated by dividing the total number of attempts within the time period by the total number of unique test takers.
The average time spent section shows the average time spent by learners who passed the test and the number of learners who passed.
Please note: Data is processed and available to view in real time.
Performance funnel
In the performance funnel section, you can view the number and percentage of learners who started, completed, and passed the practice test.
The data displayed in the performance funnel shows all learner attempt data for a selected date range.
Version history
The version history section helps you to keep track of your edits.
- Review the version log to see all updates you have published to practice tests, along with the dates that each version of the test was available to learners.
- Click “filter date range” to view practice test insights for the date range in which that particular version was, or is currently available to learners.
Pro tip: Be specific
When you update your practice test, add detailed notes to better understand how learners respond to different versions of the test.If you reference a certain question, be specific about what the question was. Your learners are shown the questions in a random order. So, if you only say, "Updates on question number 5," your learners won’t be able to follow.
Remember, the words you use here are also visible to your learners, so the more specific you are, the better!
Question analytics
In the question analytics section, you can dive deeper into each question to determine where learners got stuck.
- Use the search box to quickly find questions by searching for keywords.
- Select the dropdown to filter questions by success ratio.
- For each question view the average time spent, number of learners, and success ratio. Select “show details” to see a breakdown of which answers learners chose.
- Select “edit question” to jump right into the editor so you can make updates to your practice test based on practice test insights.
Note: The data displayed in the question analytics reflects how learners responded the first time they saw a question. For learners who retake tests, only the first response will be included in the data.
Flexible date range selector
With the flexible date range selector, you can view insights for a customized period of time.
Inconsistent data error
When viewing insights across multiple test versions, the combined data may be misleading if the versions differ significantly.
Major updates to questions, such as changing answer options or correct answers, can lead to inconsistencies in question analytics. In such cases, an Inconsistent data message will be displayed.
If you see an Inconsistent data error, please use the version log to select the date range for a single version of the practice test. This approach lets you analyze how each version of the question performed separately, providing you with accurate data.
Pro tip: To improve long-term insights when making major changes to questions, here are some best practices:
- Delete and recreate questions
- Avoid editing existing questions significantly
- Maintain the position of the correct answer (For example, keep the correct answer in position 4 in both versions)
Major changes can include:
- Altering the question's core meaning
- Changing the number of answer options
- Completely replacing an answer option
Question quality for multiple choice questions
For the latest version of your practice test, we calculate a question quality rating for multiple choice questions that 50 or more learners have attempted.
The question quality rating is based on two key factors from classical test theory (CTT):
- Discrimination: Discrimination refers to how well a single question is contributing to our understanding of a learner’s performance on the practice test. A low discrimination item can signal a question that is confusing, ambiguous, has multiple correct answers, or is even inaccurate.
- Difficulty: Difficulty refers to the proportion of learners who get a question correct (the higher the number the easier the question). Questions that are very easy or very hard can signal problems with a question.
While viewing the latest version of the practice test, you'll see one of three ratings next to multiple choice questions:
✅ Good
- Question is performing as expected
- Data indicates learners have understood what's being asked
⚠️ Needs attention
- Data indicates a potential for improvement.
- Your expert judgment can validate whether or not this is true.
- Review practice test insights and decide if you’d like to make an improvement
📊 Not enough data
- Fewer than 50 learner attempts
- Rating pending more responses
-
Performance: Coding Exercise Insights
Read articleThis article explains how to navigate to your Coding exercise insights page, which includes numerous metrics about how learners are utilizing coding exercises in your courses.
Please note: Coding exercise insights are available for instructors who have published coding exercises. Learn how to create a coding exercise.
Table of Contents
- How to navigate to your Coding exercise insights page
- Coding exercise insights page features
- Coding exercise level view
How to navigate to your Coding exercise insights page
You can find the Coding exercise insights page as part of the instructor Performance features:
1. Navigate to the Instructor view (Learn how).
2. Click Performance on the left-hand side.
3. Under Engagement, click on Coding exercise insights.
Coding exercise insights page features
On the Coding exercise insights page, you can explore a wide range of statistics for any course with at least one coding exercise. Click on the dropdown at the top to select any applicable course.
Then, use the following dropdowns to tailor your insights.
- Coding exercise: Filter insights by individual coding exercise or select All coding exercises.
- Date range: Select the preset timeframes over the Last 7 days, Last 30 days, or Last 12 months.
If you have courses included in the Udemy Business content subscription, metrics for Udemy Business learners are included in the Coding exercise insights graphs and tables. To view performance data specific to Udemy Business learners, click the Udemy Business tab near the top of the page.
The Minutes spent section includes a breakdown of the total number of minutes learners have engaged with one or all coding exercises over the specified date range.
Please note: It takes approximately 48 hours from the time spent for the data to be fully processed and available to view.
In the Performance data section, you can view and compare various statistics across your coding exercises. Click Show details to view more information for each coding exercise.
Coding exercise level view
After clicking Show details, you can view additional insights for each coding exercise.
The Performance funnel includes statistics on the number of learners who have viewed, clicked to run test, and completed a coding exercise successfully. Click the Edit coding exercise button to access the Plan exercise page, where you can make updates to your coding exercise (Learn how).
-
Instructors: How to Create Featured Questions
Read articleThe Featured Questions tool is a great way for instructors to prominently surface important questions and answers to students of their courses. Instructors can choose to feature inquiries that have already been posted in the course Q&A, or write and publish new featured questions.
This article outlines how instructors can select, write or remove Featured Questions for their courses.
How to select an existing question in the Q&A as a Featured Question
If you wish to select a question and answer that has already been posted in the course Q&A as a Featured Question, follow these steps.
- Navigate to the Communications page in your instructor account and select Q&A or Featured Questions.
- Use the search tool on the left-hand side to find the question and answer you wish to select as a featured question.
- Click the three dots on the right-hand side of the Q&A question and select Add to Featured Questions.
The question and answer will be moved to the Featured Questions section of that lecture’s Q&A, which is located above the All questions section.
How to write and publish a Featured Question
To write a question and answer for the Featured Questions section, follow these steps.
- Navigate to the Communications page in your instructor account and select Featured Questions.
- Click Create new Featured Question on the right-hand side.
- Enter the applicable course information, as well as the question and answer.
- Click Publish new Featured Question and confirm you wish to publish the question.
The question and answer will be moved to the Featured Questions section of that lecture’s Q&A, which is located above the All questions section.
How to remove a question from the Featured Questions section
If you wish to remove a question from the Featured Questions section, simply do the following.
- Navigate to the Communications page in your instructor account and select Q&A or Featured Questions.
- Locate the applicable question and click the three dots on the right-hand side.
- Select Remove from Featured Questions.
Common questions
Who can create or select featured questions for a course?
Instructors will need to have Q&A permissions granted for the applicable course in order to create or select a featured question for it.
How many featured questions can be created or selected for a course?
Instructors can create or select as many featured questions for a course as they wish.
How do featured questions appear to students?
The Featured Questions section is located prominently and above the All questions section of the applicable lecture’s Q&A.
Can students reply to featured questions?
Yes. Students can reply to featured questions or upvote them if they wish, just as they can with other questions that are posted in the Q&A. Learn more about the instructor Q&A dashboard.
-
Performance: Course Engagement
Read articleThis article explains how to navigate to your Course engagement page, which includes analytics about how learners are consuming the content in your courses.
How to navigate to your Course engagement page
You can find the Course engagement features as part of the instructor Performance features:
1. Navigate to the course page (Learn how).
2. Click Performance on the left-hand side.
3. Under Engagement, click on Course engagement.
Udemy Business insights
Please note: If you have courses included in the Udemy Business content subscription, metrics for Udemy Business learners are included in the course engagement graphs and tables.
To view course engagement data specific to Udemy Business learners, click the Udemy Business tab near the top of the page. If you select the Udemy Business tab, all reports on the page will reflect engagement specifically from Udemy Business learners.
Minutes taught and active students
The statistics of minutes taught and active students are displayed at the top of the Course engagement page.
For the time period you select, via the date range filter, minutes taught is the total minutes of lectures learners have collectively viewed for your courses. By default, this includes minutes spent by any student who has viewed your courses whether they are a purchaser, free enroller, subscriber, or a Udemy Business learner.
Active students represents the number of learners who have started a lecture over the selected time period.
The corresponding graph below shows the breakdown by month or day, depending on the date range you’ve selected.
All course view
Currently, a table displays the number of minutes taught and active students for each of your courses. Additional course-level and lecture-level metrics will be added to the Course engagement feature in the coming months.
Course level view
At the bottom of the page, a table displays the number of minutes taught and active learners for each of your courses. Click See details to get additional insights for individual courses you teach, including:
- Course level metrics for minutes taught and active students, which can be filtered by date.
- A breakdown of consumption by device (mobile vs. desktop)
- Lecture highlights: this section shows the lectures with the most notes from the learners in your course and the most dropped lectures (videos in your course that learners stopped watching within 15 seconds).
- Lecture details: for each lecture in the course the Watched column shows the number of learners who have watched more than 15 seconds for any lecture. For each video and mashup lecture, the Dropped column shows the percentage of learners who stopped watching within 15 seconds. In addition, for video and mashup lectures, Amount watched column shows the average completion percentage by the learners who watched each lecture.
-
Coding exercise insights: Similar to other types of lectures, you can also view analytics specifically related to how learners are interacting with your coding exercises, including the success rates.
- To view additional insights on coding exercises, review our Coding Exercise Insights article.
- Practice test insights: This feature provides key information to understand how learners are interacting with your practice tests. Learn how to access and review practice test insights.
-
Performance: Students page
Read articleThe Students page helps instructors learn more about the students enrolled in their courses, their student’s educational interests, and the market reach of their Udemy content. This article outlines how instructors can access these insights and use them to plan new courses or make improvements to their existing ones.
How to navigate to your Students page
Follow the steps below to navigate to the Students page in your account:
1. Navigate to the course page (Learn how).
2. Click Performance on the left-hand side.
3. Next, click on Students.
Enrolled Students: After selecting All Courses, you will see the total number of unique students enrolled in both your published and unpublished courses. You can also filter a particular course to view the number of enrollments in that specific course.
Please note: Students enrolled in multiple courses will only count once toward your student total.
If you have not been granted permission as a co-instructor to access the Performance metrics of a particular course, then the enrollments from that course will not appear in your student total. As a result, the student total on your instructor profile may differ, since that total counts all unique students enrolled in courses you’re an instructor for, regardless of their permissions.
The student’s avatar will note which of your courses they are enrolled in and when they did. By clicking on the avatar, you will be directed to the student’s profile page.
Your Reach: In this section, instructors can review what countries their students reside in and what languages they speak. The latter is determined by a combination of their browser’s language preference settings, and their account’s language in Udemy. This information may provide insights for localization and new content opportunities. You can also view your market reach for a particular course by selecting it with the course filter at the top of the page.
Additional Student Interests: This section lists the most popular topics that your students are enrolled in, aside from the topics of your existing courses. If you have selected a specific course to view, with the course filter at the top of the page, then that course's topic will be excluded from this list.
This information helps you see what topics your students are interested in, and can help you choose what course you should create next. Click a topic from the list to see the current Udemy marketplace opportunities with the Marketplace Insights tool.
Udemy Business and Personal Plan insights
If you have content included in our Udemy Business and Personal Plan subscriptions, you can select the applicable tab to view related insights. Depending on the filter, you can access and view filter data on the location, languages, and topic interests of your learners.
Please note: If you're viewing Udemy Business student insights, the "Meet your students" section will not display.
Additional resources:
- Learn how to access performance tabs and track your Udemy impact.
- Learn how to describe your intended learners.
- Learn how to add captions to your videos.
-
Performance: Overview Page
Read articleOn the Overview page, instructors can review their performance via several metrics, including course revenue, student enrollments, and course ratings. This article outlines how instructors can access these metrics, and leverage the data to make improvements to their courses.
How to navigate to your overview page
Follow the steps below to navigate to the Overview page in your account:
1. Navigate to the course page (Learn how).
2. Click Performance on the left-hand side to reach the Overview page.
Overview Metrics
You can select which specific metric you wish to view on the trend graph by clicking on the applicable title. By using the course filter in combination, you can also access key, trending insights on a course-by-course basis. In addition, you can narrow or expand the timeline of the data by using the date range filter (all time, last 7 days, last 30 days, or last 12 months).
Total Revenue: Review both the all-time and monthly revenue for all of your courses, or on a course-by-course basis
Total Enrollments: View the total number of enrollments across both your published or unpublished courses. Or, select a particular course to view the number of enrollments for that specific course.
Please note:
- If you have not been granted permission as a co-instructor to access the Performance metrics of a particular course, then the enrollments from that course will not appear in your student total.
- If a student is enrolled in more than one of your courses, each enrollment will count towards the total number of enrollments.
Rating: Check the average rating for your courses or an individual course from a recent, rolling period. Course ratings are calculated by considering factors like the recency of the rating and the amount of the course that the student consumed before leaving their rating.
Udemy Business insights
If you have content included in the Udemy Business collection, you can select the "Udemy Business" tab to access and filter data on your Udemy Business earnings, enrollments, and ratings.
Leveraging Your Overview Data
You can combine and leverage the extensive data accessible on the Overview page in a variety of ways, and make improvements to your courses if required.
For example, if your revenue trend is falling, you can check the ratings and reviews for your courses to see if they are also declining. You can also search the Udemy marketplace to see if there are new or competing courses and consider whether the content in your course needs to be updated or replaced.
Additional resources:
- Learn how to manage student feedback using the reviews dashboard
- Learn how to access your performance tabs and track your Udemy impact.
-
Performance: Traffic & Conversion Page
Read articleThe Traffic & conversion page includes analytics that can provide instructors with key insights into how students are discovering their courses and their market demand. This article outlines how instructors can access their Traffic & conversion analytics to be better informed on the sales funnel for their courses.
Please note: If you have courses included in the Udemy Business content subscription, Udemy Business learners are not included in Traffic & conversion metrics.
How to navigate to your Traffic & conversion page
Follow the steps below to navigate to the Traffic & conversion page in your account:
1. Navigate to the course page (Learn how).
2. Click Performance on the left-hand side.
3. Next, click on Traffic & conversion.
All courses view
On the All Courses page instructors can view the Landing Page Visitors for their courses, as well as the Conversion Rates. The data can be filtered to show figures from the last 30 or 7 days.
The Landing Page Visitors is determined by how many unique people have visited the course landing page (CLP) in the selected date range. For example, if the same student visits the course landing page more than once, it will only be counted as one visitor.
The Conversion Rate, meanwhile, is the number of enrollments divided by the number of visitors to the course landing page over the selected date range.
Individual course view
By utilizing the course filter to select specific courses, instructors can access more detailed data for the course landing page visitors and conversion rates.
Channels for landing page visitors
By selecting the Landing Page Visitors tab for a specific course, instructors can review which channels students utilized to discover their course landing page, over the date range selected.
Numbers for the following channels are included:
Total: refers to all landing page visitors for a given course over the given time frame.
Udemy Discovery: Refers to visitors who landed on the CLP via a Udemy link. For example, this channel includes traffic coming from all pages on Udemy or via a Udemy email. It does not include traffic from search results.
Udemy Search: Refers to visitors who navigated to the CLP from the Udemy search results page.
Udemy ads and Affiliates: Refers to visitors directed to the CLP by Udemy ads & affiliates.
Instructor Promo: Includes the number of visitors to the CLP that stemmed from an instructor’s personal marketing efforts: i.e. instructor coupon link and referral codes.
Outside Sources: shows visitors to the CLP that came from non-Udemy ads and affiliates. For example, the visitor found the course via Google, or through a link sent from a friend or co-worker.
Conversion rates for individual courses
By selecting the Conversion Rate tab for a specific course, instructors can generate a line graph that displays the conversion rate over the selected time period. The conversion rates for specific dates can then be viewed by moving the cursor to various points on the graph.
The conversion rate is calculated by dividing the number of enrollments by the total number of unique landing page visitors.
Top webpages directing traffic to your course
In the top webpages section, instructors can see the most often used sources from which students navigated to the course landing page. This information informs instructors of key webpage sources that lead students to discover your course landing page.
When available, the source URL for traffic to your Udemy course page will be shown.
Please note: Source URL is not available for traffic from Udemy ads and affiliates, the Udemy Discovery channel, or Direct traffic source (see below for more information regarding a Direct source).
The number of visitors is posted for the source, and when applicable, the instructor coupon code will also be visible. The top webpages can be viewed for all channels or filtered to see the leading referrers from one specific source (explanations of each channel are outlined above). The top 100 sources for each channel are available and are sorted by the number of visitors.
What does a direct source indicate?
Visits from a Direct source are tracked when a student clicks on the course URL in a browser, but we don’t have enough specific data to source the visit. For example, this could be caused by students opening the course link in a new tab (i.e. right-clicking and selecting "open in a new tab”).
Please note: Multiple visits from the same student in different channels will be counted once in each channel.
Additional Resources:
- Learn how to access performance tabs and track your Udemy impact.
- View our rules and guidelines for marketing tools.
- Learn more about instructor promotional agreements and the Udemy Deals Program.
-
Performance: How to Track And Understand Your Udemy Impact
Read articleThe Performance dashboard includes extensive tools and analytics to help instructors track their course performance, view learner insights, and understand the overall impact they’re having on Udemy.
This article outlines how instructors can utilize the Performance features to gain key insights about their courses and learners, and identify opportunities that will help them improve their success on Udemy.How to navigate to your Performance dashboard
Follow the steps below to navigate to the Performance dashboard in your account:
1. Navigate to the Instructor view (Learn how).
2. Click Performance on the left-hand side.
3. You will see an Overview of your course performance, including the option to select the Students, Reviews, Engagement, and Traffic & conversion pages.
Permissions
In addition to the course’s instructor, co-instructors and teaching assistants can review performance analytics if Performance permission has been enabled for that particular course.
Udemy Business insights
For instructors with content included in the Udemy Business collection, many pages in the Performance dashboard offer the ability to access and filter data specifically for Udemy Business. Udemy Business insights are currently available on the Overview, Students, Reviews, and Engagement pages.
Please note: If you have courses included in the Udemy Business content subscription, Udemy Business learners are not included in Traffic & conversion metrics.
Performance pages
Overview: instructors can review their performance via several metrics, including course revenue, student enrollments, and course ratings. Learn more.
Students: this helps instructors learn more about the learners enrolled in their courses, their student’s educational interests, and the market reach of their Udemy content. Learn more.
Reviews: Displays all learner ratings and reviews left on an instructor's courses. Learn more.
Engagement: Includes the Course engagement and Practice insights pages, with analytics to help you understand how students are consuming and engaging with your courses and course items.
Traffic & conversion: Includes traffic and conversion analytics that can provide instructors with key insights on how learners are discovering their courses and their market demand. Learn more.
-
Featured Reviews
Read articleA Featured Review is an algorithmically chosen course review, which will help highlight a positive experience the student had with the course, and encourage prospective students to enroll.
The review will be posted on the course landing page in a section called “Featured Review,” and will appear above other reviews students have left.
Please note: during the program’s initial testing phase, only English speaking courses will receive Featured Reviews. Eventually, however, we intend to add Featured Reviews to all eligible, non-English speaking courses as well.
Providing Feedback on Featured Reviews
Instructors will see a notification in the Reviews section of the Instructor Dashboard when their course receives a Featured Review. In this section you'll be able to provide feedback on the Featured Review program, or the specific review that’s been selected.
Please note: since featured reviews are algorithmically chosen, instructors cannot manually select or request which review gets featured. This is so prospective students can get an objective view of why the course received a particularly, positive review.
Review Requirements
Listed below are the summary of requirements for Featured Reviews to display. Please keep in mind that this is not an exhaustive list of review and course requirements, and are intended to shed some light on what goes into determining Featured Reviews.
- A course must have at least 5 eligible reviews for selection by our algorithm, in order for a Featured Review to display.
- Eligible reviews must have a rating of 4.5 or higher. In addition, the user leaving the review must have completed at least 20% of the course, and the review must be no more than 2 years old.
Featured Reviews will be added to courses as they receive eligible reviews. Moving forward our team will continue to test the Featured Reviews program, and enhance it if required.
-
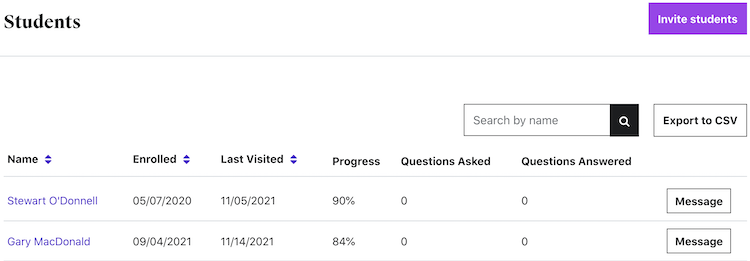
Accessing Your Student List
Read articleThis article outlines the student list, which includes information about a learner’s course consumption, questions they’ve asked or answered, and when an instructor has corresponded with them.
Table of contents
- How to access your student list for a specific course
- Student list information
- Export as a CSV
- Why is a user name on my revenue report but not on the student list?
How to access your student list for a specific course
You can access the student list for a specific course by following these steps:
1. Navigate to the course management page (Learn more).
2. Click Students on the left-hand side.
Student list information
On the Students page, you can monitor your learner’s course progress with the following information
Name: The user name the learner has selected for their Udemy account.
Enrolled: The date the learner enrolled in your course.
Progress: The percentage of total published lectures in your course that the learner has completed, or marked as complete.
Last Visited: The last date the learner accessed and consumed content from the course. This will help you determine whether a learner has recently been active in your course recently.
Questions Asked: This total indicates how many questions a learner has asked in the Q&A, which helps demonstrate which learner may require more assistance.
Questions Answered: The number of questions a learner has answered in the Q&A helps identify learners who are highly engaged in the course.
Message: Click this icon to be directed to the Messages page, where you can write a new direct message for that learner. The messaging tool will automatically add the learner’s name as the recipient.
- Learn more about our rules and guidelines for messaging students.
See below for additional columns only available when using the Export as CSV feature.
Export as a CSV
Additional columns are available only when exporting the data as a CSV. Click the Export as CSV button to automatically receive an email with a CSV file
The following columns are available only in CSV file format:
Started Date: The date that learners began viewing the course material- Please note: This information may differ from the enrollment date.
Lecture Last Viewed: The video lecture that the learner last visited in the course.
- This provides context about what a learner last reviewed in your course and can help you engage with them more effectively.
Udemy Business: A column in the CSV titled Udemy Business will indicate whether the learner enrolled via the Udemy Business content subscription program
- This information is also visible in the Student List web view as a “Udemy Business” tag next to the Student Name
Learn more about the Performance Students tab.
Why is a user name on my revenue report but not on the student list?
When a learner receives your course as a Udemy gift, their username will be added to your student list, after they redeem the gift code and enroll in your course. The username of the gift purchaser, however, is listed in the purchase tab of your Revenue Report and is not included on the student list (unless they purchased the course for themselves previously).
-
Educational Announcement and Promotional Email Analytics
Read articleTo help you craft compelling messages to engage your students, you can view performance analytics for new educational announcements and promotional emails you send. These include:
- Open rate, click-through rate, and unsubscribe rate for promotional emails
- Open rate, number of views of the educational announcement in the course taking experience, and the unsubscribe rate.
- Benchmarks for these figures to help you understand how your performance stacks up
Promotional Emails
As promotional emails are sent and received by students, new analytics figures will update in the Communications section of your course management page, under the Promotional Emails tab.
The Promotional Emails tab includes the following categories:
- Created: The date the promotional email was created.
- Open Rate: The percentage of students who opened the email, out of all who received it.
- Unique CTR. The Click-through rate. Out of all those who opened the email, this is the percentage of students who clicked on any of your Udemy course links you included in the announcement.
- Unsubscribe Rate. This is the percentage of students who received the email that unsubscribed from receiving these types of emails from you going forward.
Note: For instructions on how to send a promotional email, please click here.
Educational Announcements
After you send educational announcements to your students, the analytic figures will begin to update in the “Communications” section of your course management page, under the Educational Announcements tab.
The Educational Announcements tab includes the following categories:
- Created: the date the educational announcement was created will be posted here
- Open Rate. This metric tells you the percentage of students who opened the email, out of all who received it.
- Unique Views. Since these announcements are posted in the “Announcements” section in the course itself, this counts the number of unique students who viewed the educational announcement within the course taking experience.
- Unsubscribe Rate. This is the percentage of students who received the email that unsubscribed from receiving these types of emails from you going forward.
Note: For more information on how to send an educational announcement, please refer to this article.
-
Instructor Q&A Dashboard
Read articleThe Questions & Answers (Q&A) dashboard is designed to help instructors monitor and respond to student questions with ease and efficiency, as well as identify insights for course enhancements.
Please note: Q&A is not available in free courses.
Table of Contents
- Accessing the instructor Q&A dashboard
- Managing the Q&A dashboard
- Using AI assistance in Q&A (beta)
- Accessing Q&A Insights
Accessing the instructor Q&A dashboard
To access the instructor Q&A Dashboard, follow the steps below:
1. Navigate to the Course Page (Learn how).
2. Click Communications on the left-hand side and select Q&A.
Here are some highlights:
- Review and respond to questions across all courses using either the single or double pane view.
- Filter for unanswered or unread questions. This allows instructors to get back to students faster, keeping students more engaged in the course.
- Mark a response as the Top Answer to indicate the top response to other students, or select a question and answer as a Featured Question.
- Access the lecture where the student asked the question and view timestamps of when a question was asked and responded to. All of this provides additional context to students’ questions to help instructors respond efficiently.
Managing the Q&A dashboard
Set your availability
If you wish to provide students with a timeframe for when they can expect to receive a response to their question, or inform them that you’re out of the office, you can do so by setting an availability status. The availability status can be set on an individual course basis or for all of your courses.
You can access the Availability page by clicking Availability on the left-hand side of the course management page.
Please note: the instructor availability status can only be set by the primary instructor on the course.
Marking your questions as "Read"
The message should automatically be marked as read when any of the below events happen:
- Instructor puts their cursor in the reply text field
- Instructor clicks anywhere in the message (to see all replies, open the discussion post, go to the student’s profile, mark as helpful etc.)
The instructor can also manually mark the question as read or unread by clicking on the dot at the top of the question.
The difference between unread and unanswered
Unread indicates that you, as the instructor, have not yet marked the question as "read". Unanswered means that no response has been marked as "Top Answer". Only the instructor and original poster can mark responses as "Top Answer".
Sorting by oldest to newest
When an instructor sorts questions by oldest to newest, the question time will be determined by the most recent response time.
Upvote a question or answer, or sort by most upvoted
You can recommend questions or answers you believe others should see by clicking on the upvote (arrow) icon.
You can also find and prioritize questions that have received upvotes from your students, by using the Most upvoted filter.
Getting context for the question
If the student asked a question within a particular lecture, the instructors will see a link to the lecture right underneath the course title.
Using AI assistance in Q&A (beta)
Udemy has launched a beta version of its AI-supported Q&A tool, initially available to select instructors teaching specific, technical topics in English. We expect to expand coverage of the feature to additional topics and languages over time.
When responding to learner queries, certain instructors might come across the "AI-generated answer" feature available for newly submitted questions. If an instructor selects this function, the tool will create a preliminary response based on an AI model trained with the course material and previous Q&A sessions for the instructor to review..
Instructors should review the AI-generated draft response for accuracy, making any necessary edits before posting. Once the response is finalized, instructors can post it like any other response by simply clicking "post".
Please note: An AI-generated draft will only appear if:
- The course is in a category/subcategory included in the current beta
- The original learner query does NOT have an image attached
- The original learner query is ~350 words or less
Please allow up to 12 hours after the original learner query for an AI-assisted response to become available.
Currently, the answers generated with the “AI” label is only visible to instructors for informational purposes and will not be displayed to learners.
Accessing Q&A Insights
Instructors can explore insights to better understand their learners' questions. To access this feature, click on Q&A Insights.
Filtering options: You can filter by course and time range.
Lectures with the most questions: From your selected course, cards displaying lectures with the most learner questions will appear. You can explore different themes for lectures with a sufficient number of questions for analysis. Click each theme bubble to view summaries and sample quotes.
- Not seeing themes? This might be because there hasn't been enough learner interaction to identify recurring topics within the set time frame. As learner engagement increases, themes will become visible.
Click on the buttons Watch lecture or Edit lecture to view or update your content directly from the dashboard based on user insights.
-
How to Manage Student Feedback Using the Reviews Dashboard
Read articleReviews are one of the main ways that learners can leave public feedback on a course for other students to see. This article explains how instructors can view all reviews and review insights using the Reviews dashboard in the Instructor tab.
Table of contents
- How to access the Reviews dashboard
- Filtering Reviews
- Responding to reviews
- Why do some ratings have no comments?
- Leveraging attribute-level feedback from students
- Course rating
- Accessing Reviews Insights
- Exploring Reviews Insights Themes
How to access the Reviews dashboard
1. Navigate to the course page (Learn how).
2. Next, click on Reviews.
Filtering reviews
You can filter by course, recency, star rating, and source ("All" or "Udemy Business"). In addition, you can see all the reviews your courses have received by using the CSV export feature. The export feature is posted below the Sort By option on the right-hand side.
Responding to reviews
To respond to a review, click the “Respond” button. Then, type your response in the box.
Please note: Only visible instructors of a course can respond to reviews. Learn how to check whether or not you are a visible instructor.
Once you click “Post Response”, your response will be posted on the course landing page. You can edit or delete a response at any time.
For each course, only one review per student is publicly visible. This means that once a student updates the review, your response will no longer appear on the course landing page.
Although ratings without reviews do not appear on the course landing page, you are able to reach out to your student by clicking "Respond" and asking for clarification. The student is notified and is prompted to leave a review. If the student leaves a review, it will appear on the course landing page.
Why do some ratings have no comments?
Requiring students to leave comments would make it more difficult for a student to leave a review, which in turn, might result in artificial ratings (they might choose to not leave a review as a result). We hope to capture a wide range of opinions about a course, good or bad. View our frequently asked questions about Udemy's course reviews.
Leveraging attribute-level feedback from students
Sometimes students leave a star rating but do not include a written review. While the star rating is helpful for other students, reviews are more helpful when instructors understand the context behind the star rating. Through attribute-level feedback, students can select a reason for their review. Your dashboard will become populated with this feedback as students respond to this prompt.
You can view the attribute-level feedback a specific student leaves for your course, in the reviews section of the instructor dashboard. If a green, plus sign appears beside the feedback, then this indicates that the student believes the course includes that attribute. If a red negative sign appears, however, then the student indicated the course did not include it. If a question mark appears, then the student did not select yes or no.Course rating
A course’s ratings can be viewed via the Instructor Dashboard and are posted as the Course Rating. The Course Rating is calculated by considering factors like the recency of the rating and the amount of the course that the student consumed before leaving their rating.
View detailed guidelines on Udemy’s review system.
Accessing Reviews Insights
Instructors can access their course rating insights to gain better insights on their course's ratings. To access this feature, click on the Insights tab.
Filtering Options
You can filter insights by course, time range, and star rating. The available options for star ratings include:
- 4-star ratings and above
- 3.5 stars and below
Exploring Reviews Insights Themes
You'll see up to five insight themes based on learner questions in your course. Click each theme bubble to view the theme summary and sampled reviews.
Not seeing themes? This might be because there hasn't been enough learner interaction to identify recurring topics within the set time frame. As learner engagement increases, themes will become visible.
You can also use the Edit course buttons to view or update your content directly from the dashboard, based on user insights.
-
How to Welcome and Congratulate Students With Course Messages
Read articleYou can send optional, automatic welcome and congratulations messages for your course, to encourage students to engage with the course when they enroll, and congratulate them when they complete it.
Create a Course Message
To create, automatic, courses messages for your course, please follow the steps below:
- Navigate to the course page (steps on how to can be viewed here).
- Click Communications on the left-hand side. If your course has been published, then you can access the messages by clicking Course Messages on the right.
- Use each of the text boxes to type in the messages you want students to receive when they enroll in or complete your courses
- Click Save to save the content of your messages
Note: It is against Udemy's guidelines to promote your other courses or external resources in the welcome and congratulations messages. Please ensure your messages follow our Direct Messages Rules and Guidelines.
-
Send Promotional Emails and Educational Announcements
Read articleThis article explains how instructors can send promotional emails and educational announcements for their courses.
Promotional emails vs. educational announcements
If you have published multiple courses to the Udemy marketplace, you can use promotional emails to market your Udemy courses to learners who have enrolled in at least one of your paid courses.
Review rules and guidelines for sending promotional emails.
Educational announcements are delivered by Udemy to the email inboxes of learners, and are also posted in the "Announcement" section of your course. Educational announcements are to provide your learners with free resources related to your course material.
Review rules and guidelines for sending educational announcements.
How to send a promotional email or educational announcement
To send a promotional email or educational announcement, please follow the steps below.
Please note: To send promotional emails and educational announcements for a course, instructors must be listed as visible and have the manage permission enabled. Learn more about instructor permissions and how to edit them.
1. Navigate to the course management page
2. Select Communication on the left-hand side.
3. Next, click Announcements, and then Compose at the top right.
4. Select whether you wish to send an educational announcement or promotional email.
5. Now select the eligible courses you wish to send your educational announcement or promotional email to, the learners you wish to include, and then enter the message's content.
If you wish to save the announcement or email as a draft, so you can complete it later, click Save as draft at the bottom of the page.
When you’re ready to resume editing, click Drafts at the top of the Announcements page, and then select the applicable draft.
Please note: our educational announcement and promotional email text editor does not support emojis, so do not include emojis in your message. Doing so will cause formatting and delivery errors. We also recommend creating your message in the announcement and promotional email text editor, rather than copying and pasting in your message, to help avoid formatting issues that might occur.
6. You can double-check the notification before sending it by using one of the preview options, which can be accessed by clicking Preview above the subject line. The options allow you to preview how the announcement will look in your course or in the email itself.
7. If everything is in order, click Send.
Encountering issues sending an educational announcement or promotional email?
Review troubleshooting steps you can take if you’re unable to send an educational announcement or promotional email.
-
Instructors: Udemy Badges Guide Explanation
Read articleWe [Udemy] strive to connect students with the right instructors and courses to help them accomplish their learning goals. There are a lot of things we do to make these connections, but one particular area we are investing in is badges. Badges highlight to prospective students when instructors and courses deliver a unique experience. As we identify important signals to call out to students you’ll see us testing new badges.
Please note: this guide is not related to the certification preparation feature, which helps eligible learners find badge-related content to help them prepare for third-party certification exams. Learn more about how eligible learners can review and select a certificate preparation experience.
Udemy badges
Below is a list of badges, how they appear on-site, and what they highlight to students. We’ve also shared some of the contributing factors that go into earning each badge and advice and resources to help you earn them. Things to note:
- We will regularly update this guide as we introduce new badges or make significant changes to existing badges. Because all of the existing badges are still being tested, badge contributing factors, how they display, and other aspects will likely evolve. This also means that badges might be applied to courses in some languages and not others. Generally, when testing new badges we first apply them to English courses and then later to other languages if we see positive results for students and instructors.
- Today, a course is eligible to receive up to 2 badges at a time. For example, a course may qualify for both Best Seller and Highest Rated; in this case, it will display both the Best Seller badge and the Highest Rated badge on the landing page.
Best Seller - Currently rolled out to users in all languages; however, factors for receiving badge may differ by language of course.
The Best Seller badge calls out to students that this particular course is the most purchased amongst a pool of similar courses.
Contributing factors:
- Course with highest recent sales within a particular combination of category and primary topic (e.g., Python - Development, Python - Business, Yoga - Personal Development, Yoga - Health & Fitness).
- Course has minimum of 4.2 average rating.
Highest Rated - Currently rolled out to users in all languages; however, only English, French, German, Japanese, and Portuguese courses are eligible to receive badge at this time.
The Highest Rated badge calls out to students that this particular course has the highest rating amongst a pool of similar courses.
Contributing factors:
- Course with highest course rating within a particular combination of category and primary topic (e.g., Python - Development, Python - Business, Yoga - Personal Development, Yoga - Health & Fitness).
- Course has minimum of 4.5 average rating.
- Course has minimum of 10 ratings.
Note: We do factor in a “rating confidence” metric when determining which course has the highest course rating within a particular Topic-Category combination. In other words, a course with a 4.8 course rating and 1,000 reviews will probably earn the highest rated badge over a course in the same Topic-Category with a 4.9 course rating and only 10 reviews.
Hot & New - Currently rolled out to users in all languages and across courses in all languages.
The Hot and New badge calls out to students that this particular course is one of the most purchased amongst a pool of similar new courses.
Contributing factors:
- Course published in last 74 days.
- Course in top percentile of Category’s historical new course revenue.
New - Currently rolled out to users in all languages and across courses in all languages.
The New badge calls out to students that this particular course is new to Udemy and should contain the most up to date information on its topic.
Contributing factors:
- Course published in last 74 days.
- Free and Paid courses.
Top-Responding Instructor
The “Top-Responding Instructor” badge calls out to students that this particular course has an extremely responsive instructor.
Contributing factors:
- Respond to 90% of students questions within 24 hours.
- Course needs to have at least 10 questions over last 90 days.
Highly Rated by Beginners - Currently being tested on users with English, German, Portuguese, French, and Japanese language preferences. Courses in all languages are eligible to receive designation.
The Highly Rated by Beginners designation is currently in experimentation, and calls out to students that this particular course is highly rated by students, who identify themselves as beginners.
Contributing factors:
- Course with a high course rating (by students who identify themselves as a beginner) within a particular combination of category and primary topic (e.g., Python - Development, Python - Business, Yoga - Personal Development, Yoga - Health & Fitness).
- Course has minimum of 10 ratings.
- Course is not labeled as Intermediate or Advanced level.
Premium - This course badge is available for English-speaking courses in select regions depending on market conditions, which are included in the Personal Plan subscription.
-
Instructors: How to Manage The Direct Messaging Tool
Read articleInstructors can use the messaging tool to send a private message to any student enrolled in your course, or to respond to a direct message a student has sent you. This article outlines how instructors can use the direct messaging tool, or disable the feature, if they do not wish to send or receive direct messages as an instructor.
How to access the messaging tool and send a private message
To access the messaging tool for your account, and send a student a private message, follow the steps below:
1. After logging into Udemy, click Instructor at the top of the page.
2. Click the Communications icon on the left-hand side and then click Messages.
3. Click Compose on the right-hand side. Enter the student’s name in the box under New Message (the tool will automatically search for matching names as you type).
4. Type your message and click Send. When a message is sent, the student will receive an email, and a notification will appear on their Udemy profile.
How to respond to a message
When you receive a direct message from a student, you'll receive a notification email. You can respond to the message by clicking Reply to Message in the notification email you receive.
You can also respond to messages directly on the Messages page.
Categorizing and searching through your messages
On the Messages page, you can categorize your messages by using filter options like marking them as unread or important. The filter option can be accessed by clicking the three dots beside the message.
You can also prioritize specific groups of messages by selecting Unread, Important, Not answered, and Show automated messages. You can also search through your messages by typing the student’s name in the search tool.
How to turn off direct messaging
If you wish to turn off direct messaging, so that the Q&A and Help Center are the primary ways students find answers to their questions, follow the steps below.
1. Navigate to your Account page and select Communications.
2. Select Turn off direct messaging and click Save. You'll no longer be able to receive or send messages as an instructor (for any of your courses).
When a student attempts to send a message, they'll see a notification indicating that the instructor has turned off direct messaging, and that they can look for answers to their questions in the Q&A and Help Center.
Please note:
- Instructors who turn off direct messaging will still be able to use the messaging tool as a student (when applicable).
- Automatic messages, as well as educational and promotional announcements for your courses won't be impacted by turning off direct messaging.
Blocking a message or reporting abuse
If you need to block future messages from a particular student, then select Block from the message options. Please note that if you send that student a message, however, then the message thread will be unblocked.
If you believe the message violates Udemy’s Terms of Service or Community Guidelines, then click Report abuse, and the message will be flagged for review by our staff.
- Learn more about Trust & Safety at Udemy.
- Learn more about our rules and guidelines regarding direct messaging.
Student engagement
-
Instructors: Udemy ChatGPT App FAQ
Read article -
Performance: Content Quality
Read article -
Understanding Differences Between Course Engagement and Revenue Report Minutes
Read article -
Performance: Lab Insights
Read article -
AI Assistant Insights for Instructors: Frequently Asked Questions
Read article -
Performance: Practice Test Insights
Read article -
Performance: Coding Exercise Insights
Read article -
Instructors: How to Create Featured Questions
Read article -
Performance: Course Engagement
Read article -
Performance: Students page
Read article -
Performance: Overview Page
Read article -
Performance: Traffic & Conversion Page
Read article -
Performance: How to Track And Understand Your Udemy Impact
Read article -
Featured Reviews
Read article -
Accessing Your Student List
Read article -
Educational Announcement and Promotional Email Analytics
Read article -
Instructor Q&A Dashboard
Read article -
How to Manage Student Feedback Using the Reviews Dashboard
Read article -
How to Welcome and Congratulate Students With Course Messages
Read article -
Send Promotional Emails and Educational Announcements
Read article -
Instructors: Udemy Badges Guide Explanation
Read article -
Instructors: How to Manage The Direct Messaging Tool
Read article